How To Felt A Shed Roof Corners

Shed Roof Felt Screwfix Diy Sanglam Shed Roof Felt Shed Shed Roof

Pin By Renee Olague On Sheds Diy Shed Diy Shed Plans Building A Shed

Framing A Modified Pyramid Roof Without Trusses General Discussion Contractor Talk Backyard Buildings Backyard Sheds Corner Summer House

5 Sided Corner Shed Roof Framing Plans Corner Sheds Shed Plans Roof Framing

Diy Corner Shed Corner Sheds Diy Shed Backyard Sheds

T Style Drip Edge Corner Install Jpg 800 X 600 100 Drip Edge Roof Drip Edge Roof Installation

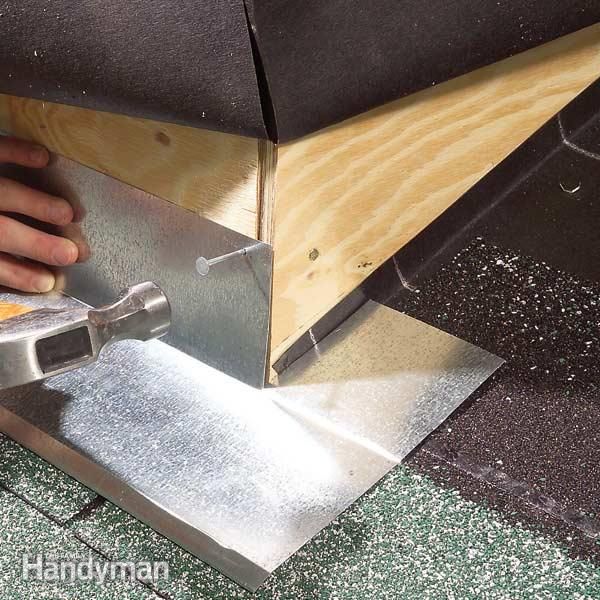
For easier cutting unroll the material on a flat surface and use a hooked blade knife to cut the felt to the size of your shed s roof.
How to felt a shed roof corners.

Corner Summerhouse 8x8 Felt Shingle Roof Free Delivery Ebay Summer House Garden Corner Summer House Outdoor Garden Sheds

Corner Shed Pent Roof Google Search House She Home Garden Ideas For Your Home Corner Summer House Corner Sheds Building A Shed

Backyard Shed Idea Corner Shed I Really Do Like This Shed Shedlandscaping Shedtypes Backyard Sheds Diy Shed Plans Wood Shed Plans

Markku Corner Log Cabin 5 75 X 3m Corner Log Cabins Building A Shed Log Cabin

Http Sketchup Google Com 3dwarehou719c9792152961 Corner Sheds Diy Shed Plans Shed Plans

Pin On Roof Repair

Billyoh 7ft X 7ft Wooden Tongue And Groove Corner Summerhouse Pent Roof 5055715922920 Ebay In 2020 Corner Summer House Summer House Garden Summer House Interiors

Corner Summerhouse 10 X10 Felt Shingle Roof Tanalised Summer House Shed Design Roof Shingles

Sol 72 Outdoor Willesden 7 X 7 Ft Shiplap Summer House Corner Summer House Shiplap Cladding She Shed Decorating Ideas

Diy Corner Shed Corner Sheds Backyard Sheds Backyard Shed
Pin On Remodels And Renovating

Corner Shed Pent Roof Google Search Terraceroofinginspiration Backyard Sheds Corner Sheds Shiplap Cladding

Corner Shed Roof Shed Triangle 1 Jpg Gable Roof Design Fibreglass Roof Roof Design

Hartwood 7 X 7 Overlap Pressure Treated Corner Shed In 2020 Corner Sheds Building A Shed Shed

Contemporary Corner Summerhouse Summer House Garden Corner Summer House Garden Cabins

A Comprehensive Overview On Home Decoration In 2020 Corner Summer House Summer House Home Essence

Pin On Home Building Repair Or Rebuild

Wirksworth 10 X 6 Ft Shiplap Summer House Lynton Garden Installation Available No Wooden Summer House Summer House Shiplap
Https Encrypted Tbn0 Gstatic Com Images Q Tbn 3aand9gcreyyi4q2lram Jnauvipbivj Idxdnr1i5idk J7mn709dhuud Usqp Cau

The Studio Corner Garden Studio By Malvern Garden Buildings Yard D I Y Buildings Corner In 2020 Garden Buildings Summer House Garden Corner Summer House

Pin On Backyard Landscaping Along Fence Rock Border

12 Elegant Corner Shed Plans Shed Plans Corner Sheds Shed

A Little Lean To Is The Perfect Storage Solution For That Small Corner Of Your Backyard Small Enough To Keep Backyard Storage Sheds Backyard Storage Tuff Shed

8 X 8 Forest Premium Tongue And Groove Pressure Treated Wooden Corner Shed 3 46 X 2 8m In 2020 Corner Sheds Shed Building A Shed
Source : pinterest.com
